WHAT IS A TESTCASE DOCUMENT?
A Testcase is a specification of the inputs, execution conditions, testing procedure expected to achieve a particular software testing objective, such as to exercise a particular program path or to verify compliance with a specific requirement.
In basic terms, Testcase is a set of actions implemented to confirm the functionality of a specific feature of your software application.
A standard testcase document contains the following elements;
Test Suite ID
Test Suite ID
Test Case Description
Prerequisites/Pre-conditions
Test Procedure
Test Data
Expected Result
Actual Result
Status
Comment
Created by
Executed by
Date of Execution
Things to consider before writing a test case
-
- It is crucial to understand the requirements of testing as well as the features that require testing.
- Offer a description of how the process of testing commences.
- Include details about the testing input, output, and expected results to verify its functionality.
- The document should be comprehensive and understandable.
- Avoid ambiguous details and information.
- Assign priority to crucial test cases.
- Avoid repeating test cases to improve the scope of testing.
- Get a peer review before concluding the document.
- Implement testing techniques to ensure the full coverage of the software application.
GENERATING TEST CASES USING THE POWER OF 2^N
Test case documentation is a crucial part of software testing and creating a sub-standard test case document defeats the whole purpose of testing as you could miss out on major functionality flaws which might end up frustrating the end-users. To generate high-quality and effective test cases, the use of 2^N (where N stands for the number of required fields) is always practical.
Let’s get our hands a bit dirty by checking the login functionality of TESTYOU. Visit http://www.testyou.in and create an account with them. Once you have successfully signed up, we are ready to start testing.
Now visit http://www.testyou.in/Login.aspx
The total number of required fields we have is two (Email Address/Login id and Password field). Using 2^N, the minimum number of quality test cases we can generate is four (2*2). We are also going to use a bit of logic to generate these four test cases. Look at the table below:
| Scenario 1 | Scenario 2 | Scenario 3 | Scenario 4 | |
| T | T | F | F | |
| Password | T | F | T | F |
Where; T represents valid
F represents invalid
STEP BY STEP TEST CASE GENERATION
For this step-by-step test case generation, we would be testing the functionality of this log in-http://www.testyou.in/login. aspx
-
- STEP 1
Create an excel or google spreadsheet for your test case documentation, filling in the elements of a test case document as listed above
-
- STEP 2
In the Test Case Description field, explain briefly the summary of the test case. For example, in our “TT” scenario (i.e., Valid Email and Valid Password), the test case description would be “Verify user can log in with a valid username and password”
The above image will be used to explain step 3- 6 as well
-
- STEP 3
Pre-condition/prerequisites are requirements that must be fulfilled before executing the test case. In this case, it would be “(a) URL must be active and functional (b) User must have signed up”
-
- STEP 4
The test procedure is the step-by-step process to execute the test. “(a) Visit the URL (b) Input test data (c) Click on the login button”
-
- STEP 5
The Test data is the data input used during the test. The test data for the positive scenario would be your sign-up details
-
- STEP 6
The expected result is the awaited result from the software application. An amazing expected result for the positive scenario would be “User should be successfully logged in and redirected to dashboard page”
-
- STEP 7
The actual result is the result yielded after executing the test. Before this can be done, the test needs to be executed. The actual result for the positive scenario would be “User was successfully signed in and redirected to dashboard page”
-
- STEP 8
Whenever the actual result is the same as the expected result, the test is said to have “passed” and if otherwise “failed”. The status column tells us clearly which test has passed or failed. Other statuses can be “not executed” if the test is not yet performed or “blocked” if testing is blocked.
-
- STEP 9
A big picture is worth more than a million. Postcondition is used to explain further the actual result. Monosnap can be used to make a screenshot of the screen after which it can be uploaded and the link can be inputted as the postcondition or you could just post the picture like it was done above.
-
- STEP 10
Any comment on the test case or test execution goes in the comment column.
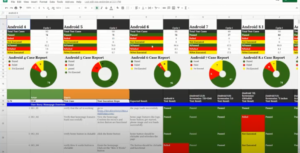
Steps 1-10 are repeated on different test scenarios. Thereafter, you will create a chart using the number of failed, passed, and not executed.
BEAUTIFYING YOUR TEST CASE DOCUMENT
Imagine a world with no colors or everything in black and white; it is not quite an exciting imagination therefore the same can be said for the software testing world. It is your goal as a tester to always make sure your test case documents are filled with color and exciting to look at. Here are some tips:
- Change the color of the element row to blue
- Conditionally format status such that; passed would have a green background, failed a red background, not executed a yellow background, etc.
- In the test case description, give positive scenarios a text color of green and negative scenarios a text color of red.
Practice makes perfect. Keep practicing and be rest assured that soon, you will be able to produce the image attached.